MODULE 1
AN INTODUCTION TO UKE
In this module you will discover the bare necessities of playing your ukulele including:
- String Names
- How to Tune Up
- Ukulele Body Parts
- The Fretboard
- How To Hold Your Uke
- How To Play Notes
- How To Recognise Chord Shapes
- How To Strum Effectively
UKULELE STRINGS

The four strings of a ukulele are named after their respective pitch and numbering system.
G - The string closest to the player's face is the first string, also known as the G string. It is typically tuned to a pitch of G4.
C - Moving down, the next string is the second string, also known as the C string. It is tuned to a pitch of C4.
E - Moving down again, the third string is the E string, tuned to a pitch of E4.
A - The fourth string is tuned to a pitch of A4. It is also called the "high string" because it produces the highest pitch among the four strings, even though it is closest to the floor when holding it to play.
Ukulele strings are typically made of nylon, nyglut or a similar synthetic material to produce a brighter, more clear sound. Some strings we recommend are Aqulia for brightness or D'Addario for a warmer sound.
EXERCISE: Click the audio below to hear what each of the strings sound like in this order: G - C - E - A and pluck your associated strings to hear if they sound the same or not.
TUNING YOUR UKULELE
The string names and their corresponding pitches are an essential aspect of playing the ukulele.
Players can tune their ukuleles using electronic tuners, tuning apps, or by ear, using another instrument or reference pitch. Proper tuning ensures that the ukulele produces the correct notes and harmonises with other instruments in a musical ensemble or band.
EXERCISE: Watch the video below to see good friend Will Grove White, from the Ukulele Orchestra of Great Britain explain how to tune your ukulele using a clip on digital tuner, which we recommend you have for effective tuning.
THE ANATOMY OF THE UKULELE
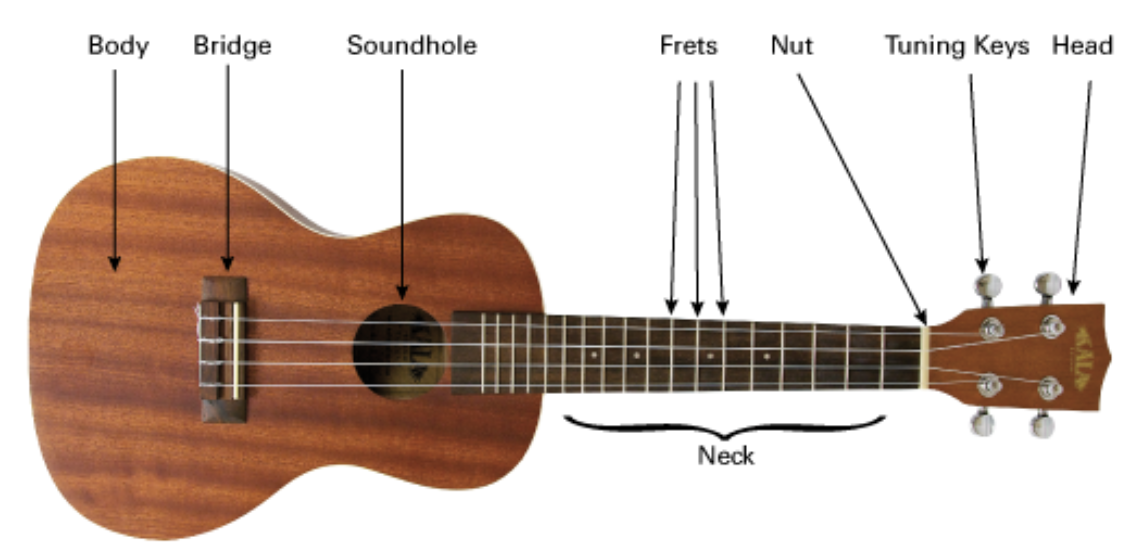
Ukuleles consist of several key components that work together to produce sound.
- Headstock: The top part of the ukulele, where the tuning pegs are located. The tuning pegs are used to adjust the tension of the strings and tune the ukulele.
- Tuning pegs: Small knobs located on the headstock used to tighten or loosen the strings and tune the ukulele.
- Nut: A small strip of material, often plastic or bone, located at the top of the fretboard, where the strings rest before heading towards the tuning pegs.
- Fretboard: The flat, long piece of wood running down the length of the ukulele's neck. It is divided into sections with raised metal wires called frets. The frets indicate where to place your fingers to produce different notes and chords.
- Neck: The long, thin part of the ukulele that extends from the body to the headstock. It is attached to the body at the heel and is typically made of wood.
- Body: The main part of the ukulele that houses the soundhole, strings, and bridge. The body can come in a variety of shapes, including the standard figure-eight shape, pineapple shape, and cutaway shape.
- Sound hole: The hole in the body of the ukulele that allows sound to escape. The size and shape of the sound hole can affect the tone and volume of the instrument and usually appears on the front of the body, although some ukuleles can also have an extra sound hole on the top side too.
- Bridge: The piece of the ukulele that anchors the strings to the body. It is typically made of wood and can come in a variety of shapes, including the classic tie-bar bridge and the more modern pin bridge.
- Strings: Four nylon or fluorocarbon strings that run from the tuning pegs, over the nut and fretboard, to the bridge. When plucked or strummed, they vibrate, producing sound.
- Saddle: A small strip of material, often plastic or bone, that sits on the bridge and helps to transfer the vibration of the strings to the body of the ukulele.
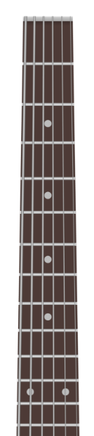
The Frertboard
|
The fretboard of a ukulele is the long, thin piece of wood that runs down the length of the neck. It is also known as the fingerboard or the fretboard.
|
HOW TO HOLD YOUR UKULELE
When playing the ukulele, it is essential to hold the instrument in a comfortable and stable position to facilitate proper technique and minimise strain on your hands and arms. Here is a step-by-step guide on how to hold a ukulele when playing:
- Sit or stand up straight: Good posture is essential for proper ukulele playing. Sit or stand with your back straight and shoulders relaxed. This will help you maintain a comfortable and stable position while playing.
- Support the ukulele with your forearm: Rest the lower bout (the curved part of the ukulele body) against your forearm. This provides stability and control over the instrument. Keep your forearm parallel to the ground for better support.
- Use your strumming hand: If you're right-handed, use your right hand for strumming, and if you're left-handed, use your left hand. This hand should be positioned near the sound hole or above the ukulele's body, depending on your playing style.
- Hold the neck with your fretting hand: The hand that presses the strings (fretting hand) should hold the neck of the ukulele. Place your thumb behind the neck, opposite your fingers. This will give you stability and control while forming chords and switching between them.
- Find a comfortable position for your fretting hand: Adjust your hand's position on the neck to find a comfortable spot. Typically, you'll want to position your thumb roughly in the middle of the back of the neck, allowing your fingers to reach the strings easily.
- Experiment with different hand angles: Experiment with different angles for your fretting hand. Some people prefer to have their hand perpendicular to the neck, while others tilt it slightly to one side. Find the angle that feels most natural and allows you to fret the strings without straining your hand or fingers.
- Relax your grip: It's important to maintain a relaxed grip on the ukulele. Avoid squeezing the neck or pressing the strings too hard. This can cause unnecessary tension and make it difficult to play smoothly. Use just enough pressure to produce a clean sound without straining.
HOW TO PLAY (FRET) NOTES
When fretting notes either individually or as chord shapes, it is important to make sure your fingers are as close to the fret markers as possible to avoid buzz sounds.
You also want to make sure that you use the fingertips to press down on the string and make sure that the string is pressed down firmly against the fret and not the front pads of your fingers because you could deaden the strings below. Ideally you want your fingers pointing back at you as illustrated below. This will produce a clear, clean note.
You also want to make sure that you use the fingertips to press down on the string and make sure that the string is pressed down firmly against the fret and not the front pads of your fingers because you could deaden the strings below. Ideally you want your fingers pointing back at you as illustrated below. This will produce a clear, clean note.

Remember, playing notes on a ukulele takes practice and patience. With regular practice, you will develop the muscle memory and finger strength needed to play notes cleanly and accurately. Start by practicing basic chords and simple melodies, and gradually work your way up to more complex pieces. Watch the video in the next section for more details on fretting.
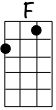
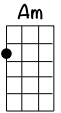
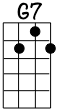
UNDERSTANDING CHORD DIAGRAMS & FINGER POSITIONS
|
Ukulele chord diagrams are graphical representations of ukulele chords. They are used to show players where to place their fingers on the fretboard of the ukulele to play a particular chord. A typical ukulele chord diagram consists of a vertical line representing the string, with horizontal lines representing the frets.
The vertical lines represents the strings. The horizontal lines represent the frets, with the top line being the nut (the part of the ukulele that separates the headstock from the fretboard). The circles or dots on the diagram indicate where to place your fingers on the fretboard. The fret positions are invisibly numbered from 1 - 12 descending down the fretboard. The placement of the fingers is important because it affects the sound of the chord. If the fingers are not placed in the correct position, the chord may sound muted, buzz or out of tune. Watch the video below for a full explanation |

HOW TO STRUM CHORDS ON YOUR UKULELE
BONUS DOWNLOADS: Here are a few extra PDF downloads to help you discover even more top tips about the ukulele and playing music.
ALL DONE HERE? Once you are happy and feeling confident to move on, click the button below for the next module where you will explore your first song.